The Making of Chain Mail Armour
I will provide photos or diagrams showing how it is done in the near future.
To make Chain Mail armour you need the following tools:
A mandrel to wind the wire around to make the 'springs' from which you cut the rings from.
A pair of pliers - reasonably big so you can twist the rings close when making them and the suit of chain mail.
A good set of aviation tin snips with a straight cut - I have tried other methods of cutting the rings like bolt cutters and hacksaws but the tin snips are the best way I have found to cut through the wire.
Storage containers like 2 or 4 litre plastic ice cream containers to hold the rings, both closed and open.
Wire of some sort (and plenty of it) to make the rings from.
*Pair of gloves when working with the wire and mandrel - helps to stop rubbing against the skin.
*A bench vice to hold the mandrel securely if you want to work in a workshop or garage.
*- Not essential but would be handy to have to aid in the creation of chain mail.
Below is a drawing of a basic mandrel/hand-crank used for the winding of wire into springs to be cut.
If you want to learn how to make a simple mandrel then go here for detail.
Below is a chart specifying the wireand ring sizes for chain mail rings;
| Wire size | Ring Size | ||||
| (SWG) | (mm) | Minimum | Maximum | Recommended | inches |
| 13 | 2.3 | 9 | 18 | 14 | 9/16 |
| 14 | 2.0 | 8 | 16 | 13 | 1/2 |
| 16 | 1.6 | 7 | 13 | 8 to 10 | 5/16 to 3/8 |
| 18 | 1.2 | 4 | 10 | 7 | 1/4 |
| 19 | 1.0 | 2 | 8 | 5 | 3/16 |
The method of making chain mail that I know is;
A) Making the spring rolls of rings
Cut a length of wire (about 2 metres long) and bend in half at the centre point.
Put the middle of the bent piece of wire on the mandrel while holding the wire in one hand.
Slot a nail into the hole on the rod of the mandrel and pull the U-shaped wire taunt again the nail while holding the handle of the rod - This will keep the wire pressure constant again the nail and hold the wire in place when you start winding the rod.
Start rotating the rod making sure the wire and nail won't come loose (it does happen) by keeping the pressure constant when winding the wire.
Wind the wire around the rod evenly and tightly so that you get a spring coil look when you finish winding the wire around.
Remove the nail from the hole at the end of the rod and then slide the rod off the mandrel base making sure to also slide off the completed spring of wire.
Repeat about 5-6 times before taking a break - It is hard work and is not easy. Also, the wire will spring back at you towards the end because it is held under pressure when you wind it around the rod - so be ready when you come to the end of the wire for it to spring back when you release it. Usually you will only be able to do this about 2-3 times a day because of the effort required by your arm muscles (but then it will help you get stronger when it comes time for you to stand up and fight someone when you have your armour on)
At the end cut off the straight bits of wire at the two ends so that when you start cutting the rings you don't have to contend with extra bits of wire.
B) Making the closed rings for your armour
Cut the wire across the spring so that each ring is cut once. This is a tough job at times - but then who said life was meant to be easy!
Once you have cut a few springs of the wound wire you should have a whole pile of open rings ready to be closed.
Get one pair of pliers in your left hand and put a ring in the pliers and hold it close to the point where you have the opening in the ring and then hold the other pair of pliers with your other hand and grip the other side of the opening of the ring and twist the ring shut. It may take a few gentle twists to get the ring shut well but it is worth it!
Repeat over and over again until you are happy with the number of closed rings you have - and you will need many thousands of these rings!
C) Making the chain mail pattern
Get one open ring and slide four closed rings onto it and twist it shut as shown in diagram one below.
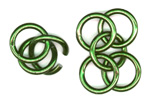
Diagram one - making the Chain Mail pattern
When you need to start another row of rings, add one open to two of the closed ones on the side you want to start on then add another two to make up four and then close the ring. This is demonstrated in diagram two below.
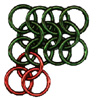
Diagram two - adding rings to the Chain Mail
To return to the Armour & Weapons Production page click on the Back icon below.